30 by 30

On my 27th birthday, I challenged myself to lose 28 pounds by my 28th birthday.

I almost did that. I'm still 9 pounds away, but what's 9 pounds after 19?

Today is my 28th birthday, so it's time for a new challenge.

I'm hopping on the bandwagon of 30 by 30 challenges. That is to say, by the time I turn 30 I will have baked/cooked/made all the following semi-ambitious dishes. 95% of them are fattening, but I'm thinking that by starting with a 2-year lead time, I can make one per month (doubling up closer toward the big 3-0) and consider these fattening, ambitious dishes a monthly treat.

In no particular order, I will attempt:

1. Fresh pasta
2. Lobster rolls
3. Duck (suggestions on how to prepare welcome)
4. Fried calamari
5. Bananas Foster
6. Mozzarella cheese
7. Candied bacon
8. Spanakopita
9. Filled cupcakes
10. Queso fundido
11. Lemon meringue pie
12. Soft pretzels
13. Cured meat (thinking pastrami, salami, or chorizo)
14. Potato chips
15. Guiness chocolate cake (made brownies, same thing).
16. Sticky buns
17. Croissants
18. Graham crackers
19. Flavored margaritas
20. Chocolate pudding
21. Potato bread
22. Crepes
23. A whole fish
24. Naan
25. Beef Wellington
26. Buckeyes
27. Gnocchi
28. Fried yeast donuts
29. Empanadas
30. Clam chowder

Specifying "by 30" may make it sound like I'm freaking out about turning 30. I'm really not - I still have two solid years of my twenties to be a twentysomething, dumb at times if the situation warrants. By 30, I hope to have children, and some of these recipes will be great to have under my belt by then. Needless to say, I'll be blogging along the way in an attempt to hold myself to these challenges.

Cheers to my twenties!

Texas-Style Queso


The past few days, I've been quarrantined at home with the worst cold I've had in years - mainly because I actually haven't even gotten sick in almost 2 years. I knew once it happened it would knock me flat.

So when Josh asked for a "savory snack," my comfort food cravings immediately turned to thoughts of cheese. I whipped it up in minutes, but that's not to say it hadn't taken me several attempts over a few years to get it right the first time. I refused to use Velveeta. Heavy cream just made more of a macaroni and cheese-type sauce. One day I spotted the oft-ignored can of evaporated milk that had been hiding in the pantry since who knows when, and thought I'd give it a shot.

The secret all aloig was the evaporated milk. Who'd have guessed?

You will need:

1 tablespoon vegetable oil
2 teaspoons flour
1 tablespoon (or more, depending on taste) chopped green chiles
1 tablespoon chopped jalapeno pepper (seeded if desired)
2 tablespoons chopped white onions
1 small Roma tomato, seeded and chopped
6 ounces evaporated milk
4 ounces cheddar and/or Monterey Jack cheese, shredded
1 teaspoon chopped cilantro
Dash ground cumin
Dash cayenne pepper
Hot sauce to taste
Salt to taste

In a small saucepan, heat vegetable oil over medium-low heat. Once oil is shimmering, add chiles, jalapenos, cilantro and onions, and heat until soft but not browned. Whisk in flour to make a light roux, then pour in evaporated milk. Heat until bubbling, then remove from heat and stir in cheese. Add chopped tomatoes, cumin, cayenne pepper, hot sauce and salt. Serve immediately.

"Splendid" Salted Caramel Ice Cream


I started picking up inklings of Jeni Britton-Bauer late last fall, when a local coffee shop here in Nashville started carrying her artisan ice creams flown in from Ohio. While I never made it over to the coffee shop and subsequently stopped thinking about artisan ice cream through the winter, in early spring I read that Jeni was opening her first store outside of Ohio in - you guessed it - Nashville.

Shortly thereafter, Josh decided on a whim to buy me an ice cream maker.

A few weeks later, I saw Jeni's book in a store in New York City, with recipes for her signature flavors.

Then, my good friend Krista managed to get to Jeni's before I could and proceeded to rave about it.

That was the last straw - the universe wanted me to have Jeni's in my life, damn it, and who was I not to take heed? I bought the book.

The book, aside from the fact that it's a page turner if only because you cannot wait to see what crazy combination Jeni teases you with on the following page, is outlined by season so you can make a point of using the freshest ingredients possible. In addition to ice creams, the book includes recipes for sorbets and frozen yogurts, as well as for ice cream cookies, cocktails and sundaes. It is comprehensive and gorgeously photographed, and judging by the first one I tried, the recipes themselves are foolproof. The ice cream froze as solid as you'd find it in any scoop shop, which can sometimes be difficult to acheive at home. The pure flavors of caramel and sea salt blasted through the custard, as well as a surprising taste of pure butter - even though there is no butter in the recipe. I am still amazed that I made this quart of amber heaven, but I did - and I'm ready for round 2 with Jeni at my side.

You will need:

2 cups whole milk
1 tablespoon plus one teaspoon corn starch
1 1/2 ounces (3 tablespoons) cream cheese, softened
1/2 teaspoon fine sea salt
1 1/4 cups heavy cream
2 tablespoons light corn syrup
2/3 cup sugar
2 teaspoons vanilla extract (I used vanilla bean paste)

Prep:

Make sure the bowl of your ice cream maker has been frozen for at least 24 hours. Do not remove from freezer until the moment you are ready to spin the ice cream macine.

Mix about 2 tablespoons of the milk with the cornstarch in a small bowl to make a smooth slurry.

Whisk the cream cheese and salt in a medium bowl until smooth.

Mix the cream with the corn syrup in a measuring cup with a spout.

Fill a large bowl with ice and water.

Heat the sugar in a 4-quart saucepan over medium heat until it is melted and golden amber in color. Remove from the heat and, stirring constantly, slowly add a bit of the cream and corn syrup mixture to the caramel: it will fizzle, pop and spurt. Stir until well combined, then add a little more and stir. Keep adding the cream a little at a time until all of it is incorporated.

Return the pan to medium-high heat and add the milk. Bring to a rolling boil and boil for 4 minutes. Remove from the heat and gradually whisk in the cornstarch slurry.

Bring back to a boil over medium-high and cook, sitrring with a heatproof spatula, until slightly thickened, about 1 minute. Remove from the heat. If any caramel flecks remain, pour the mixture through a sieve.

Gradually whisk the hot milk mixture into the cream cheese until smooth. Add the vanilla and whisk. Pour the mixture into a 1-gallon Ziploc freezer bag and submerge the sealed bag in the ice bath. Let stand, adding more ice as necessary, until cold, about 30 minutes.

Pour into frozen canister and spin until thick and creamy. Freeze in the coldest part of your freezer until firm, at least 4 hours.

Recipe and method copied from Jeni's Splendid Ice Cream at Home.

Vanilla Bean Marshmallows


For a few years when I was very young, right before we moved to and stayed in Texas, my family lived in a tiny town in Massachusetts. I don't remember a whole lot from those days, but when I went to college in Rhode Island I visited often with a family that used to live down the street from us when we lived there in the late 80s. New England, specifically Rhode Island, Massachusetts and New Hampshire, remains one of my favorite places on earth. After all, it is what introduced me to quite possibly my #1 flavor combination: marshmallows and peanut butter.

My mom somehow found out about this winning combination sometime before I started school, and opening my lunch box to find a Fluffernutter (marshmallow fluff and peanut butter sandwich) was like finding gold to a kindergartener. Once we moved to Texas, the kids would gawk at my funny-looking sandwich with raging jealousy. "What is THAT?" How did they not know?

I would later find out that Fluffernutters were a New England thing, but of course that's all changed now - Fluffernutters are no longer a well-kept secret among New Englanders, and the flavor combination can be found anywhere. But, naturally, I had to make my own. It only took me 23 years since my first bite of Fluffernutter to get around to it.

You will need:

3 1/2 envelopes unflavored gelatin  powder
1 cup cold water
2 cups granulated sugar
1/2 cup light corn syrup
1/4 teaspoon salt
2 large egg whites or reconstituted powdered egg whites
1 tablespoon vanilla bean paste

In the bowl of your stand mixer fitted with the whisk attachment, pour 1/2 cup cold water and 3 1/2 packs of gelatin. Let sit while you make the sugar mixture.

In a medium pot combine sugar, remaining water, corn syrup and salt. Heat over low heat and whisk until sugar is dissolved, about 3-5 minutes. Turn heat up to medium and let sugar come to a boil. It will bubble up quite a bit - do not let it overflow. Let it boil for 8-12 minutes, until it reaches 240 degrees F (measure with a candy thermometer).

Once mixture is at 240 degrees F, turn off heat and gently pour it in the mixer over the gelatin with the mixer on low speed. Once all of the sugar has been added, turn the mixerall the way to high and beat for for 6-8 minutes. It should grow in size and be white and fluffy. About 3-4 minutes in, add the egg whites to a separate bowl and beat until stiff peaks form. with a hand mixer. Once stiff peaks are formed, add egg whites and vanilla bean paste to the sugar/gelatin mixture and beat until just combined.

Pour marshmallow mix into the 9 x 13 pan. You will not be able to get it all out of the bowl, but I found it helpful to spray a spatula with cooking spray. Dust powdered sugar on top and let sit to firm up for 3-5 hours.

Once firm, turn the pan upside down on a cutting board to release marshmallow rectangle. Cut them into pieces. I found the easiest way to do this was with a pizza cutter.

Every blog I read about making marshmallows warned of the ridiculous stickiness, the impossibility of getting the whole mixture out of the bowl, the difficulty of removing the marhsmallows from their resting pan. I experienced none of these fiascos, but you must follow these precautions:

1. When you think you've used enough powdered sugar and corn starch on the bottom of your resting pan, you haven't. Use more than you think you could possibly need, then add some more.

2. Pam cooking spray is your best friend. Spray your spaulta, spray your knife, spray your hands.

3. A stand mixer is essential. It is a work horse and it will not let you down. Turn that baby all the way up and let it go. I don't know if I can honestly suggest trying this without one.

Adapted from How Sweet Eats.

Vanilla Preserved Strawberries

I hesitated to post this, given that I've done something similar in the past with strawberry jam. I won't lie and say that these preserved strawberries are leaps and bounds different, but they're different enough that I think they're worth a try. Plus, they're less labor-intensive than jam.

The canning bug bit me last summer and I was practically writhing in anticipation of summer's fresh produce so I could get a move on already. There's nothing prettier than a stack of homemade jams and pickles in crystal-clear jars, and the ability to give away to friends what was just ripening in your backyard the day before brings a feeling of community, of old-timey nurturing.

Or, some might say, perhaps I just glorify food too much.

Obviously these preserved strawberries can be used in many ways that strawberry preserves can; they just come out of the jar in whole, plump pieces that break and smoosh under the slightest pressure from a knife.
And, as I learned today, they add a little something to a ham and blue cheese wrap - something summery and just sweet enough that other condiments simply cannot achieve.

Note - I used powdered pectin on a whim, but looking back I would have left it out. If you want to use it for a jammier texture, add about a tablespoon.

You will need:

2 pounds strawberries, hulled but left intact
3/4 cup sugar
2 tbs lemon juice
2 vanilla beans, split and cut in half

If you are canning the strawberries, prepare your canning materials. This recipe yielded two pints.
Place the strawberries and sugar in a heavy, large pot and turn heat to medium. As the strawberries simmer they will release their own juices - once this happens, pour in the lemon juice and add the vanilla bean.
Allow the strawberries to come to a boil, and the second they do, remove them from the heat. If you're not preserving for later, let them cool slightly, then store in a glass container and refrigerate.

If you are preserving, ladle the strawberries and juice into canning jars, being sure to include one half of a vanilla bean in each jar. Leave 1 inch headspace and process for 15 minutes in a water bath canner.

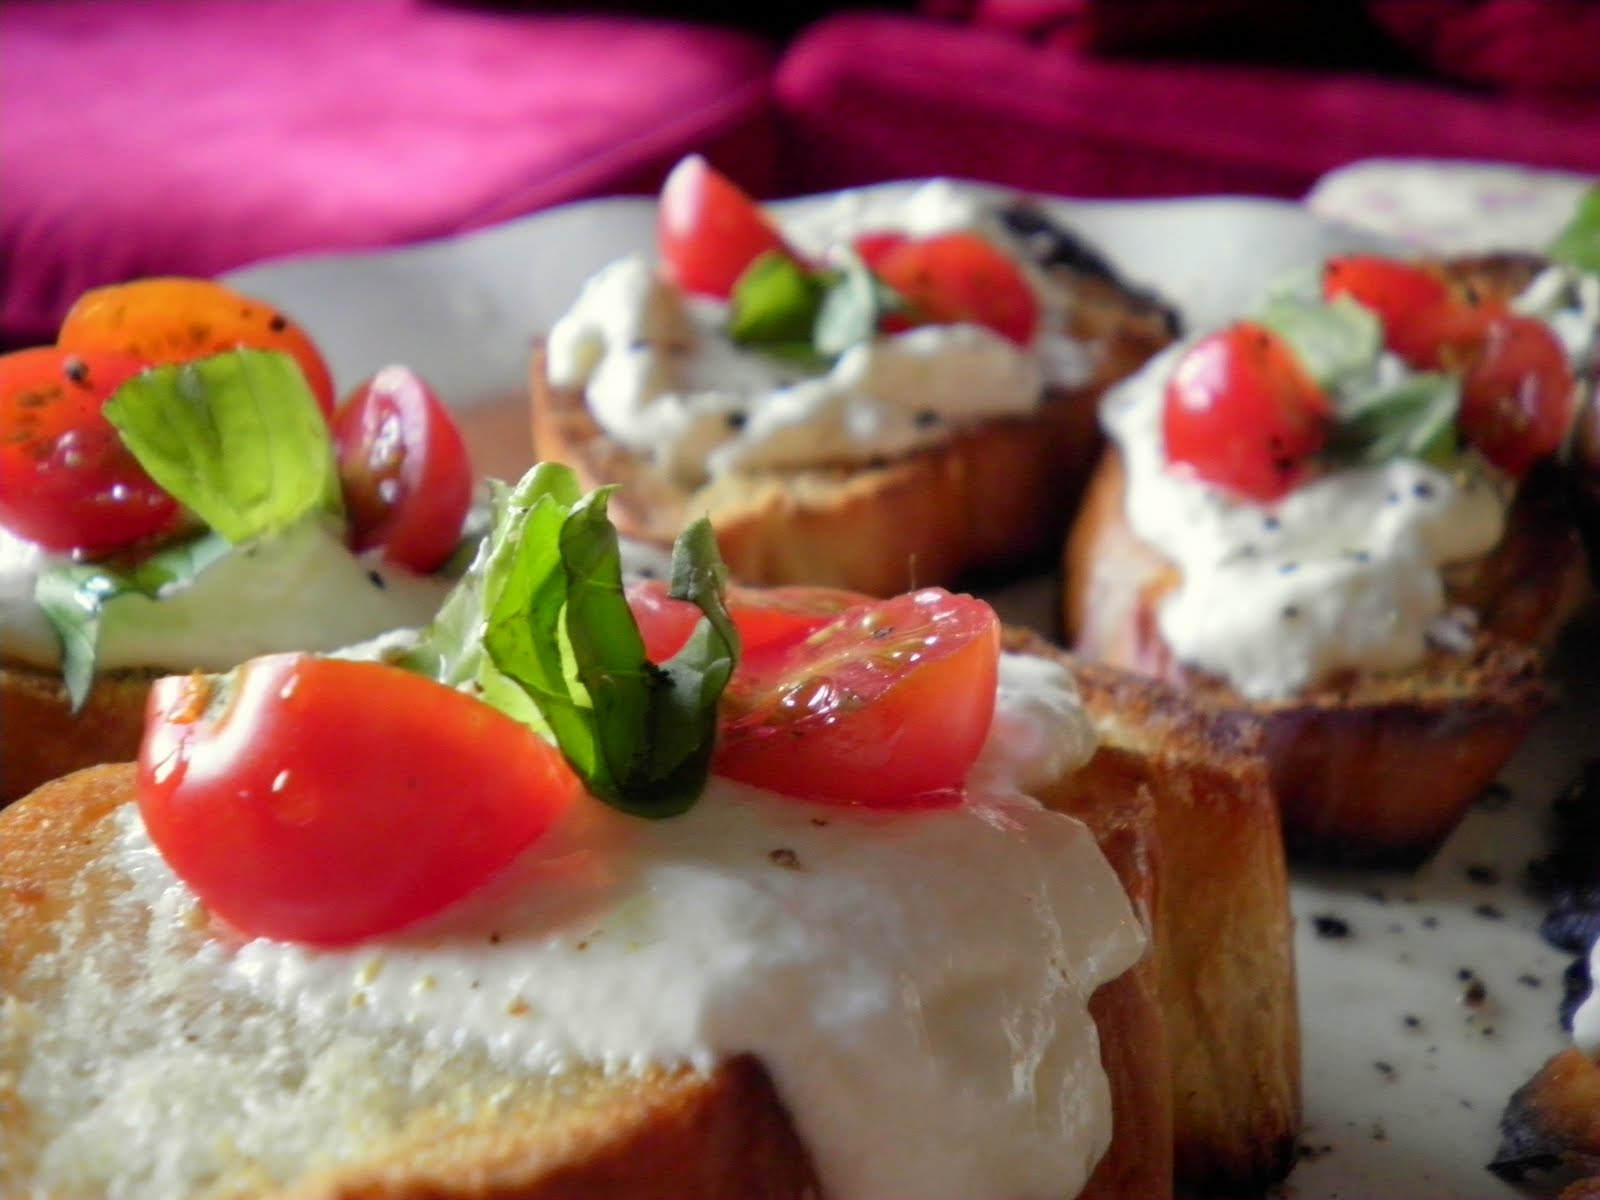
Ricotta Bruschetta (with Homemade Ricotta)


It's going to be really, really hard for me to buy a tub of Ricotta cheese at Publix ever again.

Admittedly, I am a snob about buying stuff in the store that I can otherwise make at home. Cheese, in its difficulty and artistry, is not something I deemed practical or probable for this home cook. But this cheese....oh, this cheese. It's so creamy and light that it doesn't even taste like cheese, but by comparison, it's clear that the plasticky glob that comes from a tub was certainly not the way Ricotta was meant to be enjoyed.

Comprised of 3 ingredients and salt, it's versatile enough that we ate it  in the following ways: off a spoon, piled on untoasted bread with homemade blackberry jam (more on that later), and as pictured, slathered on warm bread, drizzled with garlic olive oil and topped with home grown cherry tomatoes and basil.

For the ricotta, you will need:

3 cups whole milk
1 cup heavy cream
1/2 - 1 teaspoon salt
3 tablespoons freshly squeezed lemon juice (not bottled)

In a medium sized heavy pot, heat milk and cream over medium-high heat until it reaches 190 degrees. Ideally you would hitch a candy or deep dry thermometer onto the side of the pot, but I dropped the probe of a meat thermometer into the pot and it worked just as well. As soon as the milk reaches 190 degrees, take off of the stove and add lemon juice. Stir it gently a couple of times, then leave the pot alone for 5 minutes.

Set a fine mesh strainer lined with a few layers of cheesecloth over a large bowl, and pour the mixture into the strainer. Let the curds drain for two hours, then either eat it immediately or store in the refrigerator in an airtight container until you're ready to serve it.

To make the bruschetta, you will need:

6-8 slices of bread from a loaf of Italian or French bread
2 cloves of garlic, thickly sliced
Small handful fresh basil sprigs, 1 teaspoon reserved and chopped
12-16 cherry tomatoes, sliced in half
Pinch salt and pepper

Heat 3 tablespoons of olive oil in a microwave safe bowl for 30 seconds in the microwave. Immediately add the garlic, chopped basil, salt and pepper and put back in the microwave for 10 seconds. Let steep for 5-10 minutes, then brush each side of the bread with the garlic oil. Place bread slices under a broiler set on low, watching very closely until the bread turns golden brown, then flip and brown the other side. Remove and let cool for 5 minutes. Top each slice of bread with a smear of Ricotta, 3 cherry tomato halves and a sprig of basil. Drizzle with remaining garlic oil if desired.

Ricotta recipe from Smitten Kitchen.

Black and Blue Berry Cobbler


When I was 16 with my first taste of freedom in the form of a driver's license and a car, and heavily influenced by the Food Network (which was just gaining ground), one summer night I told my mom I was taking over dinner. I remember it vividly: we were having my and my brother's mutual friend Jeff over for dinner, and I would make chicken cordon bleu, salad and raspberry pie. After an awkward exchange with an ex-boyfriend at the deli counter, I ventured to the frozen aisles for my raspberries - the thought of buying fresh raspberries, in July, in Texas, never entered my mind. Figures. I'm also 99% sure I used a frozen pie crust.

My chicken, while tasty, was laden with toothpicks and dinner became an adventure as everyone compared the amount of toothpicks by which their chicken was fastened together.

The pie, however, was probably doomed to begin with. Had I known the joy of seasonal produce, and had I been working with a recipe (I didn't need one because I was a genius, after all) my pie wouldn't have required the exorbitant amount of sugar I doused it with. Of course I was convinced that it would be glorious and perfect, but I watched in disappointment first as the raspberry juices puddled all over my plate, and again as confused puckering, mirroring my own, spread across everyone's mouths. "I can't decide if it's too sweet or too tart," I wondered aloud.

"It's both," my dad and Jeff answered in unison.

I think I waited until college before I attempted another pie.

Fortunately, cobblers are much more forgiving. A biscuit topping instead of two crusts prevents any sogginess of the bottom crust, and what better way is there to showcase plump summer berries?
 
For the biscuit topping, you will need:

1 1/2 cups flour
1/2 cup sugar
1 1/2 teaspoons baking powder
1/2 teaspoon salt
1 teaspoon cinnamon
9 tablespoons very cold butter, cut into pieces
1/3 cup boiling water

For the filling, you will need:

2 tablespoons corn starch
1/4 cup cold water
1 tablespoon lemon juice
2-3 cups fresh blueberries
2-3 cups fresh blackberries
1/2 cup sugar

Preheat oven to 400 degrees.

To make the topping, whisk together the dry ingredients. With your fingers or a pastry knife, cut in the butter and work through the dough until the flour resembles coarse crubms. Add the boiling water and stir until a sticky dough forms.

Combine all of the filling ingredients, making sure to coat all the berries well (the mixture will appear to be a bit watery). Pour the filling into a 10" deep dish pie plate or cast iron skillet and drop spoonfuls of the dough to cover the top (do not spread the dough over the berries).

Bake for 25-30 minutes or until topping is crisp and golden brown, and berries are thick and bubbly. Cool for 10 minutes before serving.

Adapted from Cooking for Seven.